
The Guide to Creating a Luminosity Mask in Photoshop
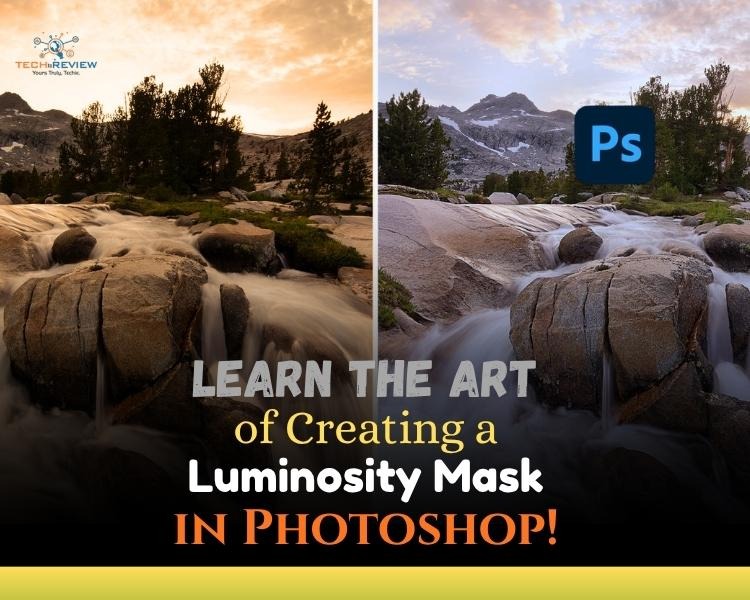
If you’re a landscape photographer struggling with dull light and high-contrast landscapes, you might face issues like a bright sky against a darker foreground, or plenty of detail but a lack of shape and depth. This is where Luminosity masks come in handy. They allow you to target adjustments to specific tonal ranges, highlights, midtones, or shadows. It lets you refine the light easily without affecting anything else.
Luminosity masks usually make landscape photos look subtler than those from global sliders and far more natural-looking. In this guide, we will show you how to create luminosity masks in Photoshop to achieve a finished image that still feels true to the moment.
What is a Luminosity Mask?
Luminosity masks are another form of masking and are a powerful photo editing tool in Photoshop. They are also known as light masks in Photoshop that let you adjust specific areas of an image. The concept was popularised by photographer Tony Kuyper starting in the mid-2000s, when he developed a technique for creating a series of light masks based on an image's luminosity levels.
Light masks are a precision technique in digital editing that allows you to create selections based on an image's brightness values. They can easily target specific tonal ranges in an image for precise adjustments to brightness, contrast, and color.
In simple terms, masks are created based on different brightness levels of an image. These masks are then used to isolate specific tonal areas and apply targeted adjustments. The final result comes as beautiful as you expected, with better tonal separation and enhanced detail in both shadows and highlights.
How Many Types of Luminosity Masks Are There?
The 3 key types of luminosity masks are :
Highlights- Also known as bright masks, which are primarily used to select the brightest areas of an image so you can make targeted adjustments to highlights without affecting shadows or midtones.
Shadows- Also called dark masks, these use a graduated selection where the darkest pixels are most strongly selected, and midtones are partially selected, allowing targeted shadow adjustments.
Midtones- As the name suggests, they are used to target the mid-tone areas of an image.
The type of light mask depends on the desired effect and the specific tonal range being targeted for adjustments.
How to Create a Luminosity Mask in Photoshop - 3 Effective Ways
There are three types of luminosity masks, so why should we learn only one to create them? Let’s understand three ways, each suitable for each type.
1. Creating Bright Masks
When you create a bright mask using the RGB channel, brighter pixels are more fully selected, while darker pixels are partially selected or remain unaffected.
To create a bright mask, you need to open an image in Adobe Photoshop and then follow these quick steps:
- If you have a PC, press Ctrl, and on a Mac, press Cmd on your keyboard. After that, click the RGB thumbnail in the channels panel to load a luminosity-based selection across the image, shown by marching ants.
- Now click the <<Save selection as channel>> icon, the selection is now saved as a channel named Alpha 1.
- The most interesting part is to double-click the “Alpha 1” and rename it “Brights 1” or “Highlights 1”.
- Again, on PC press Ctrl + D, or on Mac press Cmd+D on your keyboard to deselect the selection. After that, the marching ants are now gone, and your first luminosity mask is ready. Your selection is now saved as a channel. To use it, load it as a selection (Ctrl/Cmd + click the channel thumbnail) and apply it to an adjustment layer."
2. Creating the Dark Masks
Similar to the bright masks, the dark masks use a graduated selection; the darkest pixels are most strongly selected, with mid-tones partially selected. The steps in creating a dark mask are identical to the bright masks, with one additional step.
- On PC, press Ctrl, and on Mac, press Cmd on your keyboard. Click the RGB thumbnail in the channel tab, which activates the marching ants.
- Press Ctrl+Shift+I (PC) or Cmd+Shift+I (Mac) simultaneously to invert the selection. These are PC and Mac shortcuts, which can boost productivity.
- Click the <<Save selection as channel>> icon, and the selection is now saved as a channel named Alpha 1.
- Double-click the channel name and rename it to “Dark 1”.
- Press Ctrl on PC and Cmd on Mac along with D on your keyboard to deselect the selection, and your dark mask is ready.
3. Creating the Midtone Luminosity Masks
- So, we’ve created the masks for both bright and dark pixels. Now it's time to create a mask for pixels in between. That's where mid-tone luminosity masks come.
- Midtone masks target the mid-brightness range of an image. They are created by starting with a full selection and subtracting both the bright and dark masks, leaving only the midtone pixels selected. This means you have to select the full image and remove the brights and darks.
- You must’ve understood that first you need to create Bright and Dark masks, only then can you create mid-tone masks. Follow the instructions above and create bright and dark masks.
- Now start creating mid-tone masks by pressing Ctrl +A on PC and Cmd +A on Mac on your keyboard to select everything. Marching ants start appearing with the frames of the image.
- Press Ctrl+Alt on PC or Cmd+Option on Mac, then click the Brights 1 thumbnail. This will remove the bright masks from the selection.
- Similarly, press Ctrl+Alt on PC or Cmd+Option on Mac, and click the Dark 1 thumbnail. This removes the dark masks from the selection.
- Click the <<Save selection as channel>> icon. The selection is saved as a channel with the given name Alpha 1. Double-click and rename it to “Midtone 1”.
Powerful Tool for Images!
Luminosity masks have the ability to completely change the way you process your images. It is a powerful tool that can enhance the landscape photos from appearance to details. Though it might sound exaggerated, trust me, no, Light masks are really a game-changer for photos, increasing the quality of your image. The three masks of luminosity can make great changes in your image to make it look like a piece of art.
About author

Choose the Best Lenses for Sports Photography: A Guide

Discover the best lenses for sports photography in 2026, including telephoto and zoom lenses for action shots and sports videography.
How to Use SaveFrom Net Instagram To Download Videos

Learn how to use SaveFrom Net Instagram to download Instagram reels and videos easily on Android, iPhone, and PC with this simple beginner-friendly guide.
Canon vs Nikon: Which Camera Brand Wins?
Confused between Canon and Nikon? Compare features, image quality, lenses, and beginner-friendly DSLR options to find the best camera brand for your needs.
The Guide to Creating a Luminosity Mask in Photoshop
Learn how to create bright, dark, and midtone luminosity masks in Photoshop with this step-by-step guide ideal for landscape photographers.
Why Traditional SEO Isn't Enough in the Age of AI Search

Google search ranking obsession has ruled digital marketing for the past 20 years. Build links, optimise pages, target keywords - traffic will come pouring in.
How to Format an SD Card for a Camera: 101 Guide

Need to know how to format an SD card for a camera? Read our complete guide for quick, safe, and hassle-free formatting. This ensures smooth operation.