
How To Customize Navigation Bar On Android Smartphone

Nowadays, almost all Android Smartphones come with on-screen navigation buttons and while its efficiency is compared to physical buttons that are debatable. It’s good to have a button-less display. The back, recent, home keys are considered as navigation buttons. People, who don’t know these keys, comprise to make the custom navigation bar on Android Smartphone. Like LG and HTC, such companies have already offered options for customizing such types of navigation bars. Whereas in other Android devices, there are no options given, and then also there are some ways to customize it.
You can easily customize almost everything under the navigation bar including its looks, buttons as well as the functionality. If you have no idea about when the features are going to arrive on Android, it may take some time. Here, are few methods to customize the navigation bars in Android on both rooted as well as non-rooted devices.
Customize Navigation Bar Look with Navbar (Non-Rooted devices):
Navbar is a new app that is free of cost. It lets you add color and more to the bland navigation bar on stock Android. It works like a non-rooted device. The steps are given below to customize the bar on non-rooted devices using this app.
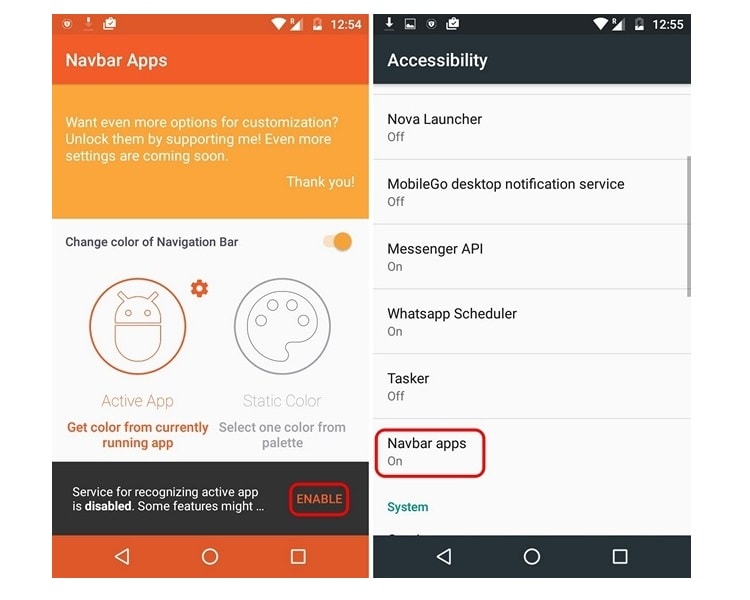
1. First of all, you have to install the app. After installing on your Android device, at the time of launching, the app will prompt you to give Accessibility permissions.

2. After completing, select a custom color for the navigation bar with its “Static Color” option and you can choose your choice. If you want the change the navigation bar’s color, you can choose the “Active App”.
You may also set certain apps to have a specific navigation bar color.
.jpg)
3. Also, you can add widgets to the navigation bar. Now, you should add a battery widget or an image in the navigation bar along with more widgets like music coming soon. If you are adding custom navigation bar apk to the images, then you will have to go for the premium version ($0.99) or the app.
Add Functionality to Navigation Bar buttons with Gravity Box (Rooted Devices):
If you are working on a rooted device, you can use the gravity box app to custom the navigation bar app to change its look. Here are the steps to use this particular app named as Gravity Box.

1. First of all, you will have to download the Xposed installer APK file and install it on your device (enable the unknown sources in Settings -> Security). After that, you have to install the Xposed Framework from the application.
.jpg)
2. After you are done with your previous step, you can search for Gravity Box in the “Download” section on the top.
There are various types of Gravity Box targeted at different Android releases. Select the version of your choice and go to
its “Versions” tab and install it.

3. Once the installation is done, you will get a notification that will activate the module and reboot your device.
Click to search “Gravity Box” and reboot your device.

4. After restarting your device, open the Gravity Box app and head to “Navigation bar tweaks”. Then, enable “Master Switch”, so all the tweaks become active after you restart it.

5. Once this is done, you will search for different options like swap back, recent Keys, show menu key, use larger icons, enable colors, add custom keys, change the navigation bar’s width, height, etc.

6. You need to go to the “Navigation Keys Actions” option to add custom functionally to navigate bar buttons.
Here, you can select double-tap, long-press actions, single-tap for menu, back keys, home screen, recent keys, etc. With the help of various actions, you can also set custom actions with third-party apps.
After you are done with all your steps, you will just have to reboot your device to see the changes or the updated features. Here, if you want, you can also theme the navigation bar with another Xposed module dubbed Xstana. If you are using CyanogenMod, you can try the Navigate theme, which helps you to bring beautiful present designs for the navigation bar. You can also go forward to replace the navigation bar with gestures through the Swipe Navigation app.
Read More Article: How To Transfer Files Between Android And Mac
About author

Top 5 Entry-Level DSLR Camera Picks to Buy in 2026

Looking for a great beginner camera? Discover the top 5 entry-level DSLR cameras to buy in 2026, featuring the best budget, travel, and video choices.
Best LED Black Friday TV Deals: Your TV Shopping Guide
Discover the best LED Black Friday TV deals for 2026: when sales start, how much you can save on LED, QLED, and OLED TVs, plus tips to spot fake discounts.
Portable Bluetooth Speaker: Best Picks for Your Travel Bag

Looking for a portable Bluetooth speaker for travel? Check out 5 easy-to-carry options with different sound, battery, and durability features.
Budget Gaming PC: The Smart Gamer’s Guide to Saving Money

Looking for a budget gaming PC? Learn how to choose the right GPU, CPU, RAM, storage, PSU, and cooling without overspending.
Why Is My Cell Phone Getting Hot? Learn the Quick Fixes

Wondering why is my cell phone getting hot? Discover the hidden triggers behind your device overheating and learn quick, safe tricks to cool it down fast.
How to Make Your Laptop Run Faster: Easy Ways to Speed Up

Is your laptop slow or freezing? Learn easy ways of How to make your laptop run faster, from clearing files and updating software to upgrading RAM and SSD.